

Yay! A step-by-step tutorial! I love doing these, but they take time to make - which is why they're few and far between, sadly. This tutorial is perfect for beginner-to-intermediate crocheters looking to make a great accessory and expand their skills! We're going to make lacy square motifs and join them as we go into gauntlets. Ready?
To make these fabulous gloves, you will need;
US H/8 (5mm) crochet hook
3 colors of worsted weight yarn (A, B, C)
Yarn needle

I decided to make my gloves monochromatic, crocheting them in three shades of gray. Unfortunately, each shade is a different yarn brand, and the only one I am sure about is Lion Brand Wool-Ease. However, this does leave your options open! Simply use your favorite worsted weight yarn/s.
Let's start at square one!
Starting with A, chain 4 and join with a slip stitch to the first chain to form a ring.

Chain 1 and single crochet 12 times in ring. Join with slip stitch to first single crochet. (Notice how I crocheted over the beginning tail? Makes the weaving in of ends easier later on) Fasten off.

Next, join B to any single crochet of your center. Chain 2, (yarn over, insert hook in same stitch, pull up a loop) twice, yarn over and pull through all 5 loops on hook (beginning puff stitch). *Chain 1, yarn over, insert hook in next stitch, pull up a loop (yarn over, insert hook in same stitch, pull up a loop) twice, yarn over and pull through all 7 loops on hook (puff stitch), repeat from * around, ending chain 1, slip stitch to top of beginning puff stitch. (12 puff stitches) Fasten off.
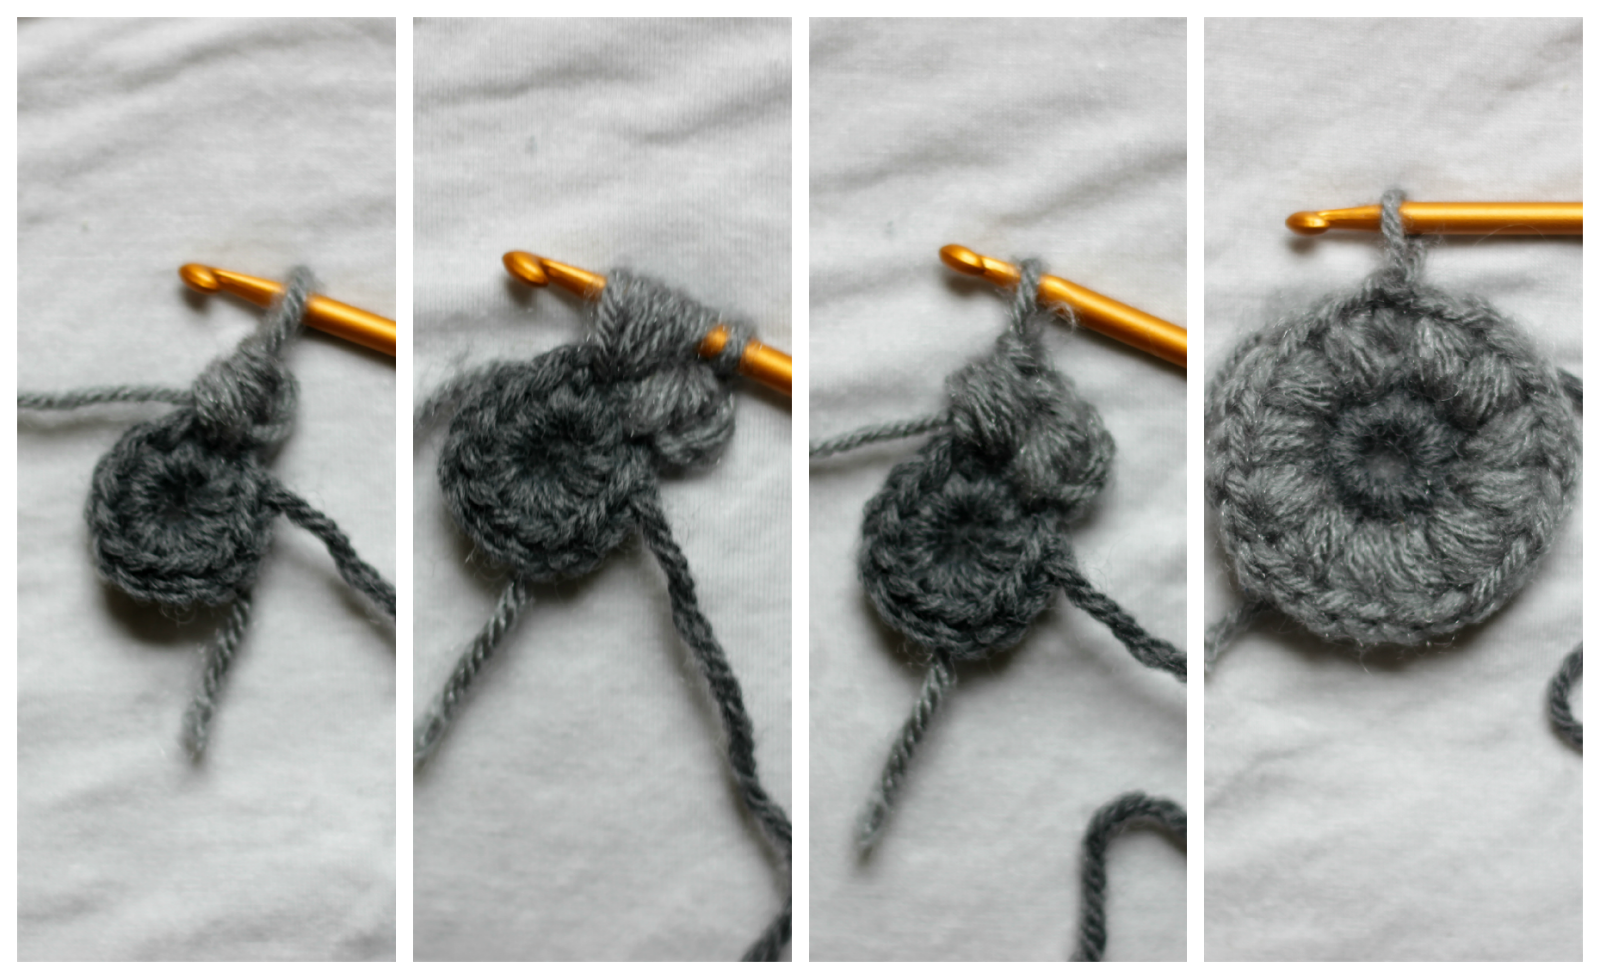
Join C to any chain 1 space of your ring. Chain 1, single crochet in same space, *chain 3, single crochet in next space, repeat from * around, ending with chain 1, double crochet in first single crochet.

Chain one, single crochet around leg of double crochet. *Chain 2, work (3 double crochets, chain 2, 3 double crochets) in next chain 1 space, (chain 2, single crochet in next chain 1 space) twice, repeat from * around.

Slip stitch into chain 1 space, chain 1, single crochet in same space, *chain 2, skip next double crochet, single crochet in next double crochet, chain 2, (single crochet, chain 2, single crochet) in next chain 2 space, chain 2, skip next double crochet, single crochet in next double crochet, (chain 2, single crochet in next chain 2 space) three times, repeat from * around. Join with slip stitch to first single crochet. Fasten off.

Now you will make another square. Work as for Square 1 up until the last round. Begin last round, working to first corner. Single crochet as usual in corner. Chain 1, take hook out from loop, insert hook through corresponding chain 2 space on opposite square from top to bottom, pick up loop and draw through, chain 1, single crochet in same space as last single crochet, chain 1, take hook out from loop, insert hook through corresponding chain 2 space on opposite square from top to bottom, pick up loop and draw through, chain 1, single crochet in next double crochet. Work in this way across edge, joining corresponding loops. (See step-by-step in photos below)


Now you've joined the two squares together! You are now going to join the squares into a tube. Keep working as for last round until you reach the next corner. Join to opposite square in same manner, following photos above and below.

And now you will make and add a third square. Join it as you did the second square, only joining one edge.

Make a fourth square, and on the last round work to first corner and begin joining to third square as shown below. When working inner corners, you can join them to either adjoining corner (the flat third square or the top square). Join across, join next corner, and fasten off.

And you're finished! Weave in all your ends and you are ready to go. Oh right - you need to make a second gauntlet. Just repeat all of the instructions!
I hope you enjoyed this tutorial and making a cozy pair of armwarmers! Play with the colors and if you want, share some photos with me! You can post your project on Ravelry or email me photos at melmariadesigns@gmail.com. I'd love to see! Happy Tuesday!
thank you for this amazing detailed tutorial! Can't wait to make these!
ReplyDeleteThanks so much for your sweet comment!
DeleteOkay I know I wanted to make these ages ago, but I just started on them today. Hope to finish tomorrow. I'm adding some lace to the top as well! I'll post pics to my rav page when I'm done!
ReplyDelete