I am definitely not the most experienced photographer - I wouldn't even call myself intermediate - but I've been learning a lot since I bought my DSLR. Here are some tips for craft photography that I've learned along the way!
Stand on a chair! This is the only way you'll get those awesome overhead shots of your work. Make sure you're not awkwardly angled, and try to get an even shot.
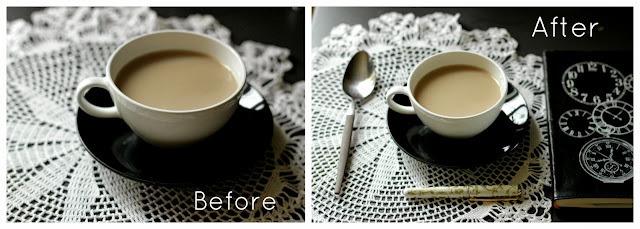
Prop and accessorize! I didn't realize how much props add to a photo until my roommate thoughtfully added a journal, a pen, and a spoon to my Chai Tea Recipe photos. Look what a difference it made!

Prop and accessorize! I didn't realize how much props add to a photo until my roommate thoughtfully added a journal, a pen, and a spoon to my Chai Tea Recipe photos. Look what a difference it made!

Angle (use that aperture!) Take a look at this cuff bracelet photo - see how I angled my camera and set a lower aperture setting? It made the bracelet blur into the background and focused on the stitch detailing in the foreground.
Play with your exposure! As I mentioned before, I am not an expert by any means - I'm still trying to figure out my own camera! But one thing I have learned is to play around with exposure (shutter speed). I prefer to leave the ISO settings on auto, because my photos come out grainy when I change the ISO. However, shutter speed can be sped up or slowed down - a lower shutter speed will let more light into your photo, and higher shutter speed will let less light in and snap the photo more quickly. Usually the best way to accurately represent the colors is to underexpose rather than overexpose, but if you can find a happy medium, hooray! The bracelet shot above is color-accurate because I used a high shutter speed (1/400) and the ISO was automatically set to 3200.
And last but not least, Picmonkey! Until I can afford to buy Photoshop Elements for my photo editing process, this is the program I've been using and it's worked out great.
I hope these tips were helpful! I hope to share more with you as I learn more along the way.


Thank you for the tips. I have a simple point and click camera which does ok.
ReplyDeleteS xx