
Today I want to show you how to do slip stitch embroidery with an easy tutorial! It's a great way to dress up plain crochet and add extra color to a piece. You'll be making a basic crochet circle coaster and embroidering it with a simple slip stitch design. This easy 10 step tutorial is written with no abbreviations and with plenty of photos for the beginner. Let's get started!

1. Grab your materials. You'll need a US I/9 (5.5mm) crochet hook, two colors of yarn (don't look too closely at the blue - it's coffee-stained), and a pair of scissors. Also a yarn needle, which I forgot to picture.

2. Start chaining. Grab your main color and make a slip knot. Chain 4 and join with a slip stitch to the first chain to make a circle.

3. First round! Chain 1, work 10 single crochet stitches in the circle. Join to the first single crochet with a slip stitch to close the round. Quick tip: I like to crochet over the beginning tail to reduce weaving in later. Lazy step!

4. Work round two. Chain 1, work 2 single crochet stitches in first single crochet you joined to in the last round and in each single crochet around. Join to the first single crochet with a slip stitch to close the round. You will have 20 single crochet stitches. The 2 single crochets worked in one stitch is called an increase and you'll be making these increases throughout the next few rounds.

5. Increase the next round. Chain 1, work 1 single crochet in first single crochet you joined to, *increase in the next stitch, single crochet in the next stitch, repeat from * around, ending with an increase in the last single crochet. Join to first single crochet with a slip stitch to close the round. You now have 30 single crochet stitches.

6. Continue to increase. Work one more round like this, working increases on the 2nd stitch of each previous increase, and working single stitches between increases. You will have 40 stitches.

7. Finish the coaster. Chain 1, work 1 single crochet in first single crochet you joined to and in each stitch around. Join to first single crochet with a slip stitch to close the round. Work one more even round, then fasten off.

8. Begin slip stitch embroidery! Grab your second color yarn (you won't need very much, so this is a great way to use up scrap yarn). This is a little intuitive, meaning you don't have to do any exact counting. Holding your yarn at the back of the coaster, insert your hook from front to back through any stitch on the first round. Grab the yarn with the hook and pull through. Insert the hook into the next stitch in the second round, grab the yarn with the hook and pull through. Chain stitch!


9. Make the flower. Using the technique I just showed you, slip stitch in and out of stitches in a flower pattern, working up and round in petals. This is pretty intuitive and doesn't need to look precise - as long as it looks like a flower and has at least 5 petals, we're good. :) Slip stitch a circle around the last round if you'd like, just for extra definition.

10. Finish everything! Fasten off your second color yarn and weave everything in using the yarn needle. If you want, you can iron your coasters using the low steam setting to flatten them a bit.

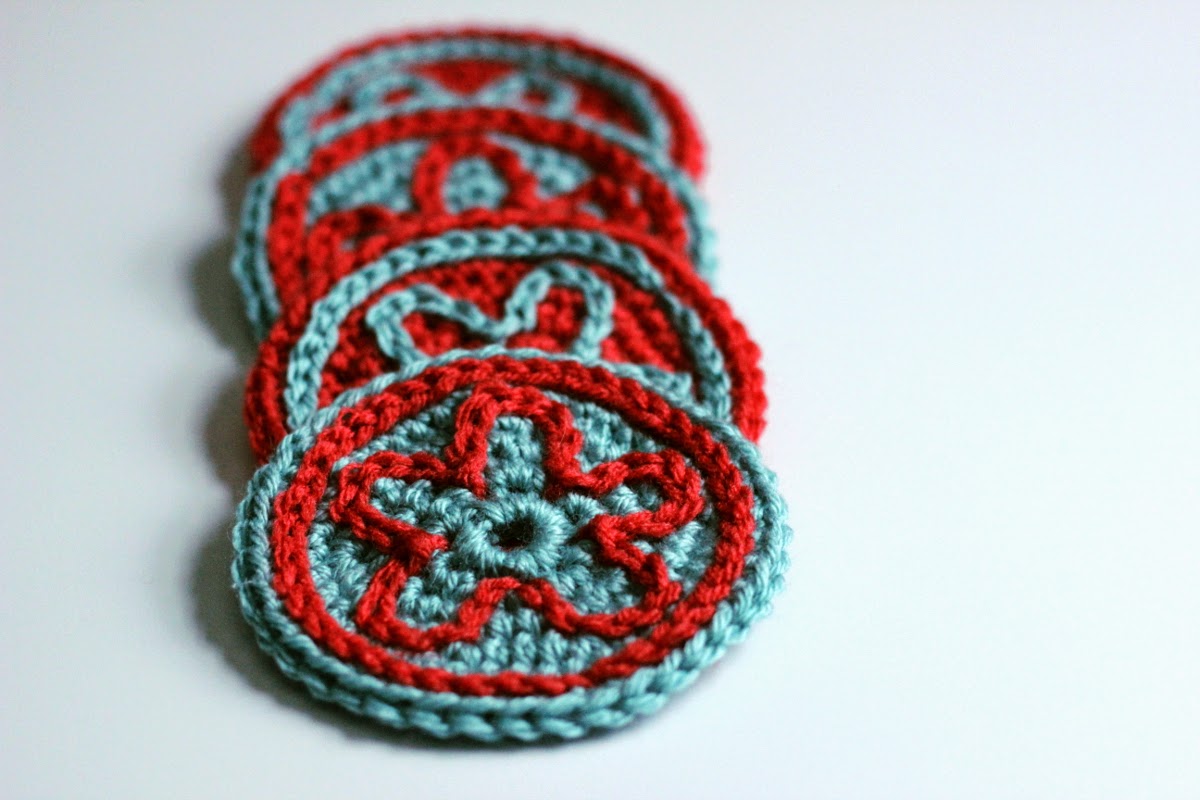
Ta-da! You just made a set of super cute flowered coasters! Make them in all sorts of color combos and toss them around your living room for a bright snippet of spring. If you have any questions at all about this tutorial, leave them in the comments section or email me at melmariadesigns@gmail.com. Have fun!
Looking for more tutorials? Check out my blog's DIY page!
8. Begin slip stitch embroidery! Grab your second color yarn (you won't need very much, so this is a great way to use up scrap yarn). This is a little intuitive, meaning you don't have to do any exact counting. Holding your yarn at the back of the coaster, insert your hook from front to back through any stitch on the first round. Grab the yarn with the hook and pull through. Insert the hook into the next stitch in the second round, grab the yarn with the hook and pull through. Chain stitch!
9. Make the flower. Using the technique I just showed you, slip stitch in and out of stitches in a flower pattern, working up and round in petals. This is pretty intuitive and doesn't need to look precise - as long as it looks like a flower and has at least 5 petals, we're good. :) Slip stitch a circle around the last round if you'd like, just for extra definition.
Ta-da! You just made a set of super cute flowered coasters! Make them in all sorts of color combos and toss them around your living room for a bright snippet of spring. If you have any questions at all about this tutorial, leave them in the comments section or email me at melmariadesigns@gmail.com. Have fun!
Looking for more tutorials? Check out my blog's DIY page!
slip stitch crochet is so much fun! I love using it on knit and crochet projects!
ReplyDelete